Monday, May 6, 2013
Wednesday, May 1, 2013
Draw from a short story- In-class exercise Wed. 5/1
At the beginning of class, I'll distribute copies of a short story by author Lydia Davis. After reading the story, you will make a drawing that combines whatever details, neurosis, humor, etc. that you got from the work. Any materials can be used.
Wednesday, April 24, 2013
Front Page Assignment (Extra Credit Opportunity--due Monday April 29th)
Pick out a headline story from the newspaper that has the
power to elicit a strong emotional and visual response. Consider how you are
personally affected by the story. Ask yourself: Is the political personal? What
images does the story conjure up in your mind’s eye?
You should select your story from the front page of a
national paper like the New York Times or the Chicago Tribune. Local newspapers
might also serve, but not the fabricated headlines of a tabloid like the
National Enquirer.
Although some stories may be accompanied by a photograph,
you are expected to build a visual interpretation all your own. Remember that
you are not doing a narration or illustration of the article; rather, you
should consider the source as the core from which to draw an emotional and
aesthetic response.
In doing this, you are limited to using a monochromatic
palette (white, black, grays, and a chosen hue). This restricted palette forces
you to be creative and stretch your interpretative powers. Some works by
well-known artists that may help to better understand the project are Francisco
de Goya’s The Sleep of Reason Produces
Monsters, Sue Coe’s How To Commit
Suicide in South Africa, and George Tooker’s Government Bureau.
Final Project--Choose from 3 prompts
•Proposals due Monday, April 29th: Proposals must include 5 COMPLETE sketches, 3 artist references, and a typed, written portion presenting your ideas for the assignment you have chosen. Please also include planned materials, paper size/type, etc. I will check your proposals and meet with everyone individually during class on the 26th. It's important that you're in class that day to discuss your project proposal with me in person, if for any reason you cannot be in class keep in mind you will need to schedule an alternate time to meet with me!
Prompt #3: The List Assignment
Select a word or sentence fragment from column A and combine it with one from column B. You may elaborate on the combination however you choose, but a selection from each column must be the starting point for the assignment. Your objective is to respond to the sequence in any way you see fit, using any or all of the techniques you know.
•Projects due Wednesday, May 8th for our Final Critique (and final day of class):
Drawings should be on paper that is AT LEAST the size and quality of 30”x22” watercolor paper. Any necessary materials or methods can be used.
Prompt #1: Get Lost…
Make a map of Iowa City based on your own personal experiences and views. Fictional places, memories, instructions on how to explore certain areas, written or sketched details of importance, unique information about the past, present or future can be included. Drawings can be considered as an emotional geography to the town and should be unique to how one feels and exists in a place. Brainstorm about how you spend your time in Iowa City. What activities, seasons, holidays or memories are important to you? How can thoughts, feelings or daily routines be expressed to someone who has never been here?
Examples:
-Make a drawing or diagram that portrays how you spend your days.
- Focus on a location that is important to a memorable event.
-Create a walking diagram of the classes you go to everyday.
-Make a drawing of how your nose reacts to different smells found around town.
**For examples, check out what these other artists did when asked to do this about New York City: http://www.newmuseum.org/assets/general/getlost/index.html
Prompt #2: Expanding the Narrative
This project explores the relationship between photography & drawing. Many good photographs tell a story. In preparation for this assignment, you will choose a particular photographer whose work you respond to. You will then choose a particular photograph of theirs that interests you. You are required to bring the actual book or photo you worked from to the critique. You can also bring up your artist's digital portfolio or blog on the projector in the classroom during critique, as long as you also have some kind of hard copy of the photo you chose to work from. Once you have chosen a photo, you will then expand the narrative that exists within that image. For example, what could have happened before this photograph was taken? After the photograph was taken? What could be happening outside the frame of the photograph?
In planning your drawing, consider the themes, photo aesthetic and concepts in order to expand these into a new narrative (stemming from the original photograph).
Below are some well-known photographers for you to start with:
Robert Frank (esp. his series ‘The Americans’)
Larry Clark (esp. his series 'Tulsa')
Larry Clark (esp. his series 'Tulsa')
Nan Goldin
Ansel Adams
Diane Arbus
Cindy Sherman
Cindy Sherman
Henri Cartier-Bresson
Sally Mann
Michael Kenna
Richard Avedon
Laura McPhee
Erwin Blumenfield
Neal Rantoul
Henri Cartier-Bresson
David Mussina
Carleton E. Watkins
Paul Strand
Allen Ginsberg
Walker Evans
Dorothea Lange
Suzy Poling
Annie Leibovitz
Minor White
William Henry Jackson
David Muench
Timothy H. O’Sullivan
Alexander Rodchenko
Jerry Uelsmann
W. Eugene Smith
Edward Steichen
Joel-Peter Witkin
Keith Carter
Also, some recent Pulitzer Prize winners:
Craig F. Walker (2010)
Todd Heisler (2006)
Carolyn Cole (2004)
Carol Guzy (2000)
Prompt #3: The List Assignment
There are many variants on the idea of making drawings that take off from certain verbal sequences. Below is a menu of choices to spur you to partake of more imaginative visual nourishment.
Select a word or sentence fragment from column A and combine it with one from column B. You may elaborate on the combination however you choose, but a selection from each column must be the starting point for the assignment. Your objective is to respond to the sequence in any way you see fit, using any or all of the techniques you know.
A B
I dreamt of pollination
I am the stomach
The son of outer space
The future of gone fishin’
I love atomic particles
The ecstasy of gender
The opposite of endings
Fear of ammunition
The archeology of poverty
The anthropology of honor
The ghost of the dream
The public the dictionary
The politics of the private
I consume the secular
The mechanism of ice
The absence of parallels
The project of vulnerability
The circus of X-ray
(A) tradition(s) (of) hierarchies
The breath of order
The mythology of drought
The daughter of yellow
I hate luminosity
Inventory of the sun
The nature of long shadows
In the shadows of nature
The deceit of the insect world
The price of epiphanies
Arbitrary Value in-class exercise 4/24
During class, you'll arrange yourselves in a circle and I'll be giving each of you a small, simple object that can be described with a contour line. You will then begin with a quick (2-3 minutes) contour drawing of your object.
You will then leave your object behind and rotate clockwise to the next student's drawing and object, and complete another quick contour. This is repeated until the papers are filled with drawings of various scale, including some that may overlap. At this point you will return to your own place and decide whether you want to add any more contours of your object to the drawing.
In the second phase, you will turn your paper in all directions to look for interesting movements or directional forces and also a focal point. Then, using a limited range of four values, you will work to achieve balance and integrate the background with the foreground. The values are used to describe pattern and not to create three-dimensional volumes.
Saturday, April 20, 2013


Wednesday, April 17, 2013
Reminder for materials needed on Mon. 4/22
Just a reminder that for our final day of drawing with a model we'll be working in ink. Therefore, be sure to have your india ink, bamboo brushes, and Bristol paper with you for Monday's class. You will also need to bring some small containers to hold water and different values of your ink, i.e. recycled yogurt cups, plastic or styrofoam cups, mason jars, plastic shot glasses, dixie cups, etc.
From Observation to Abstraction due Mon. 4/22
The objective of this assignment is to concentrate on purely formal issues in the creation of a visual statement. You will be required to crop a still life drawing in such a way that the immediate identification of its subject(s) becomes impossible.
Take at least three different still life objects, and use them to produce eight brief thumbnail sketches. Do not limit yourself to traditional still life materials. From these sketches, pick the most promising composition on which to base your larger and more complete final drawing in which you have cropped the original view in the thumbnail image so that we cannot recognize your factual starting point.
Take at least three different still life objects, and use them to produce eight brief thumbnail sketches. Do not limit yourself to traditional still life materials. From these sketches, pick the most promising composition on which to base your larger and more complete final drawing in which you have cropped the original view in the thumbnail image so that we cannot recognize your factual starting point.
Materials:
18”x24” Drawing paper
Any combination of graphite, charcoal, conté crayon, white pastel, etc.
Wednesday, April 10, 2013
'Drawing From a Film' student examples
 |
| 'Forrest Gump' |
 |
| 'Psycho' |
 |
| 'Eternal Sunshine of the Spotless Mind' |
 |
| 'Prozac Nation' |
 |
| 'Across the Universe' |
Drawing From a Film, due Monday 4/15
Drawing from a Film, due Monday 4/15
Materials:
For this assignment, you will be making a drawing that represents an interpretation of a film. Avoid literal or direct associations. In planning your drawing, think about the themes, imagery, general aesthetic and concepts within the film you have chosen to work from. Interpret those aspects into a drawing that is entirely your own.
Materials:
18”x24” Drawing paper
Any combination of charcoal, graphite, conté crayon, white pastel, etc.
(If you choose to incorporate ink or other wet media, please use heavier watercolor paper instead of the 18”x24” drawing pad paper.)
Monday, April 1, 2013
Wednesday 4/3: Chuck Close lecture & Grid Enlargement Self-Portrait
Below is a link to the Chuck Close lecture I showed in class this Wednesday 4/3, it might be helpful to reference the examples of his work while working on your own self-portrait:
https://docs.google.com/present/edit?id=0AcS6WX-p8zmBZGYzcnM4dDNfODRkd205OXBmcQ&hl=en
Grid Enlargement Self Portrait (due Wednesday, 4/10 for CRIT #3)
This project is a Chuck Close inspired grid enlargement drawing. The drawing should be a self-portrait, head & shoulders shot with a simple background. You must find or take a simple photograph of yourself to draw from (again, preferably a head & shoulders shot with a simple background). Start by drawing a one-inch grid across your 6”x8” photograph. Blow up the image to 18"x24" (This is 3x as big. Draw 3" squares on the drawing). (**Remember that your paper measures 19"x24" in total, be sure to account for that additional inch on the vertical, we're using the 6x8 to 18x24 enlargement to make things more simple). The objective is to choose a method of mark making and repeat this mark to create a portrait. I want you think about how your marks can project a mood. Strong results usually come from treating each 3” square as a separate drawing comprised of your chosen mark making method. Focusing on this aspect will strengthen your overall result.
Materials:
18”x24” drawing paper
graphite and/or charcoal (any combination of graphite pencil, compressed graphite, charcoal pencil, vine charcoal, compressed charcoal, conté crayon, etc.)
**please remember to spray your finished drawings to ensure that they aren’t damaged in transport or by handling them during critique, etc. Remember to only use spray fixative OUTDOORS and with proper ventilation!
Some student examples for your reference:


Some student examples for your reference:


Wednesday 4/3: Intro to Figure
https://docs.google.com/open?id=0B8S6WX-p8zmBdV9aTkc4RERudWs
Feel free to review for Monday's class if you'd like, and remember to be on time on Monday for our first day with a model!!
Feel free to review for Monday's class if you'd like, and remember to be on time on Monday for our first day with a model!!
Wednesday, March 27, 2013
**CLASS WILL NOT MEET ON MONDAY APRIL 1ST**
I'll be installing my solo show at the Art Building West Gallery on Monday, April 1st and we will therefore not be meeting as class that day. Please use that time to work on you Perspective drawings, due on Wednesday, 4/3. Your assignments should reflect that you were allowed a full work to work on them.


Wednesday, 4/3 we will meet as a class at the usual time & place.
Don't forget you are all invited to come check out my thesis show, open from April 2-8, with the reception happening on Saturday, April 6th, from 6-8pm, there will be food & refreshments!


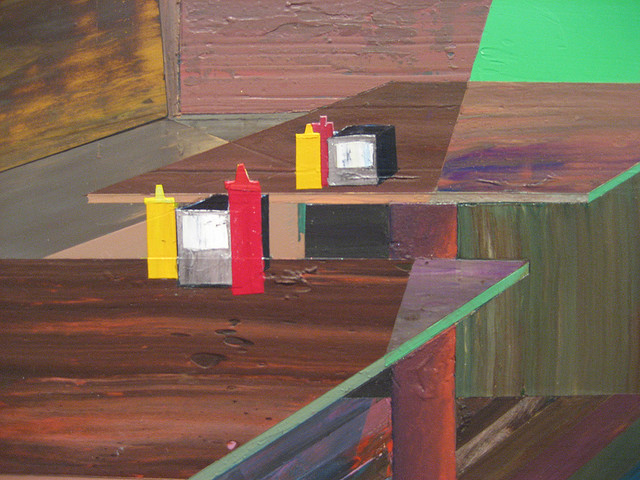
Assignment due Wednesday, 4/3: Draw an Interior Room in One-Point Perspective

Vincent Van Gogh
"Vincent's Bedroom in Arles", 1888
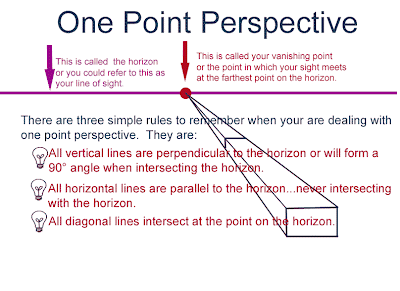
Using what you learned about perspective from this week's in class exercises, draw an interior room in one-point perspective using graphite and/or charcoal and your 19"x24" Bristol drawing paper (you will also need a ruler). Remember that YOU determine the vanishing point; think of your eyes as laser beams shooting into one point, then extending outwards horizontally to create the horizon line or "eye-level" line. Also remember that these are imaginary lines that we use to create the illusion of 3-dimensional space onto a 2-dimensional picture plane, so do your best to eliminate these process lines in your final drawing.
Some images to guide you:


'H' indicates the horizon line here, with the large red dot marked 'V' being the vanishing point.

Again the vanishing point is marked in red, with all the angles of the room and its objects descending into that point.

Example of a final result where the process lines have been eliminated:


More on Two-Point Perspective


When using two-point linear perspective, one must look carefully at the placement of the object. If the object is not perpendicular and parallel to you and you are looking at it's corner, then you probably want to work in two-point. Sometimes when working in two-point perspective one of the vanishing points is not on the page. You then must approximate where the point falls by looking at the angles of the object that you are drawing. The best way to approximate an angle and find a vanishing point in two-point perspective is to first find your horizon line. This is a level line. By using this level and placing it next to the front corner of the object one can then see the angle and continue this angle out until it intersects with the horizon line. After you have found this intersection, then you have established your vanishing point for all the planes that are parallel and recede the same direction. Repeat this process for the other side
of your object and all convergence lines will be established.
Hint: Find your horizon line first. Then find out how much distance in proportion to the object's height there is between the horizon line and the front vertical edge of the object. This will help eliminate distortions.

Basics of One-Point, Two-Point & Three-Point Perspective
One-Point Perspective (normal view) has one vanishing point. Think of pictures of lonely abandoned roads. The road eventually vanishes into nowhere, usually the center. That's your one point perspective. If you were creating an imagined space in One-Point Perspective, you could place a point somewhere on the page (vanishing point), and draw lines out from it (horizon line). Draw two vertical lines, and you've made a wall. A flat surface should follow those lines to provide scale.

Three-Point Perspective ("birds eye view") has three vanishing points. Keep in mind that when using three point perspective things get a little weird. When working with this concept, objects become very distorted since you do not have the real space to emulate the real world. Therefore, objects seem squished and distorted. This is often used in animation, especially with action comics to create drama, action and sense of space in an imagined world.

A couple youtube videos you might find helpful:

Two point perspective has two vanishing points on the horizon, usually one left and one right. Think of looking at the corner of a building from a distance, you'd see one wall disappearing off to one side, and one to the other side. Again, scale is created by placing lines radiating out from both points.

Three-Point Perspective ("birds eye view") has three vanishing points. Keep in mind that when using three point perspective things get a little weird. When working with this concept, objects become very distorted since you do not have the real space to emulate the real world. Therefore, objects seem squished and distorted. This is often used in animation, especially with action comics to create drama, action and sense of space in an imagined world.

A couple youtube videos you might find helpful:
One-Point Perspective: www.youtube.com/watch?v=adRWYWSw2XI
Two-Point Perspective: www.youtube.com/watch?v=KE3ZkWtX8UU
Wednesday, March 20, 2013
Descending Horizon Line Drawing, In class on Mon. 3/25
Important vocabulary words to understand and remember:
Horizon line (eye-level line): The line where the sky and the earth seem to meet. Also—and most importantly—this is the eye level of the viewer or artist.
Vanishing Point: Point on the horizon at which receding parallel lines meet in a perspective drawing. In one-point perspective, this is also the point directly in front of the viewer.
Diagonal vanishing point: an auxiliary vanishing point used to draw receding parallel, diagonal lines and to divide planar surfaces equally. See accompanying illustrations.
Station point: Point of view from which a drawing and measurements for a drawing are made; the place where the artist is sitting or stationed.
Picture plane: Surface of a drawing; the plane onto which images are projected.
Sighting: Technique of using a pencil to “measure” proportions and estimate angles.
Descending Horizon Line drawing: On a piece of paper draw four different
formats and in the first one have the horizon line sit one fourth of the way
down in the format. Keep descending this horizon line down in each following
format until the last one is about 3/4 of the way down. Now draw the five
forms within each format, moving them closer together as the horizon line
descends. This assignment will help you to understand the perspective
dependent on the viewer's position within the 'landscape'.
Wednesday, March 6, 2013
Tips for creating Composition & weekend homework
In class on Wednesday 3/6:
Complete at least four (4) composition studies in your sketchbook. Each study should focus on a different composition tip from the examples below. While you are working on these, I'll be coming around and taking a look at your collage portion of the midterm assignment.
Tips for creating Composition:
Rule of Thirds
Imagine that your image is divided into nine equal segments by two vertical and two horizontal
lines. Try to position the most important elements in your scene along these lines, or at the points where they intersect. Doing so will add balance and interest to your drawing.
Balancing Elements
Placing your main subject off-centre, as with the rule of thirds, can create a more interesting
drawing, but it can leave a void in the scene, which can make it feel empty. You can balance
the 'weight' of your subject by including another object of lesser importance to fill the space.
Leading Lines
When we look at a drawing our eye is naturally drawn along lines. By thinking about how you
place lines in your composition, you can affect the way we view the image, pulling us into the picture, towards the subject, or on a journey 'through' the scene. There are many different types of line -straight, diagonal, curvy, zigzag, radial etc - and each can be used to enhance our drawing composition.
Symmetry & Patterns
We are surrounded by symmetry and patterns, both natural and man-made. They can make
for very eye-catching compositions, particularly in situations where they are not expected. Another great way to use them is to break the symmetry or pattern in some way, introducing tension and a focal point to the scene.
Viewpoint
Before drawing your subject, take time to think about where you will draw it. Our viewpoint has
a massive impact on the composition of our drawing, and as a result it can greatly affect the message that the shot conveys. Rather than just drawing from eye level, consider drawing from high above, down at ground level, from the side, from the back, from a long way away, from very close up, and so on.
Negative Space
Think about the balance between positive and negative space
Depth
Because drawing is a two-dimensional medium, we have to choose our composition carefully
to convey the sense of depth that was present in the actual scene. You can create depth in a drawing by including objects in the foreground, middle ground and background. Another useful composition technique is overlapping, where you deliberately partially obscure one object with another. The human eye naturally recognizes these layers and mentally separates them out, creating an image with more depth.
Framing
The world is full of objects that make perfect natural frames, such as trees, archways and
holes. By placing these around the edge of the composition you help to isolate the main subject from the outside world. The result is a more focused image, which draws your eye naturally to the main point of interest.
Cropping
Often a drawing will lack impact because the main subject is so small it becomes lost among
the clutter of its surroundings. By cropping tight around the subject you eliminate the
background ‘noise’; ensuring the subject gets the viewer's undivided attention.
Experimentation
Take advantage and experiment with your composition - you never know whether an idea will
work until you try it.
Composition in drawing is far from a science, and as a result all of the 'rules' above should be
taken with a pinch of salt. If they don't work in your piece, ignore them; if you find a great composition that contradicts them, then go ahead and use it anyway. But they can often prove to be spot on, and are worth at least considering whenever you are working.
Monday, March 4, 2013
Homework for Wednesday 3/6--Collage portion of Midterm Assignment is due!
Just a reminder that what I will be checking on Wednesday (3/6) is the COLLAGE portion of your Midterm drawing. So for Wednesday you must have decided on a found image to work from (i.e. from a magazine, newspaper, printout from the internet, etc.), and have completed the collage in your sketchbook inspired by or reacting to the found image. Remember that your materials for the collage can also all be "found" materials, i.e. ripped up magazine pages, ripped up newspaper, construction paper, etc...and remember that you are free to use color in these. I won't actually be collecting your collage till the midterm critique (Wed. 3/13) when you turn in the finished drawing, but I will be checking that you've completed your collage. You need to hold on to your collages till the critique as it is an important source for you to work from in executing the finished drawing.
Midterm Collage Drawing Assignment, due Wednesday, March 13th
For this assignment, choose an image out of a magazine or newspaper and then create a torn/cut paper collage based on that image. Next, on another sheet of paper you will use a low-end transfer technique to collage one or two pieces of your original image photographically onto the page. Finally, your task is to draw in the surrounding areas by using the collage you had created as a source. Before starting your transfer process and final drawing, I would recommend masking off a border with your drafting tape, approx. 1” in from the border of the page.
Through this multiple step process you will have transformed a found image into your own piece, partially combining the original source with a twice-abstracted version of that same source. The final products tend to evolve into an unexpected twist of the original image.
Materials:
Found magazine or newspaper image
Glue or tape
Matte gel medium (for transfer process)
Foam brush
22”x30” watercolor paper (for final drawing)
Any combination of ink wash, charcoal, graphite, conté crayon, etc.


Acrylic Gel Transfer Guidelines
Below are instructions for the process that I demonstrated in class today (Monday 3/4). This process will be used in the final drawing portion of your Midterm assignment, due next Wednesday 3/13.
Acrylic Gel Transfer guidelines:
First, I’d recommend making a few photocopies of your original image before attempting the transfer. Ideally, you’ll want to transfer the original image, but it will be good to have a couple photocopy backups in case things go wrong on your first try.
Keep in mind that your aim is merely to transfer some pieces of your image onto your final drawing. It by no means needs to be a beautiful, clean transfer. This process holds many possibilities, but it is also a very unpredictable one, so don’t get frustrated if things don’t go perfectly, just improvise and do your best.
How to do a transfer:
1. Take your surface and make sure it is relatively clean. (Remember this will work best on nice, heavy watercolor paper. Lesser quality paper will tend to pull up when you pull off the image; essentially it will do the opposite of what we are trying to achieve.) Next figure out what image you are using and where you want it to go. You can apply the gel medium either to the surface or directly onto the image.
2. Apply the gel medium onto the image (either with a foam brush or just with your fingers) until it completely coats the surface. Different amounts get different results. Sure, you can just glom it on there, but you will have to wait awhile until it is completely dry. This can, however, achieve a thick, glossy surface with the transfer sitting on top of it. If the surface is uneven and toothy, this can be helpful. If the surface is flat and smooth, then you really need just a thin layer of medium in order to make it work.
3. Once you have the proper amount of medium going, then its basically like gluing one thing to another - pretty simple. Lay down the image, and then press it down firmly into place. Then, either with your hand, the edge of a scissor handle, wooden spoon, etc. begin smoothing and pressing down the image from the middle out. Here's where excessive medium can harm the process. If there's too much, the image will slip around on the surface. You want the image to really be sticking in place. One method is to use a roller to flatten the image, just lay down a piece of paper on top otherwise the gel will ooze all over the place. At any rate, smooth down the image with your hand or other tool until the image is solidly stuck down. No air bubbles or blobs of medium should be underneath.
4. The idea here is that the image or photocopy is 100% in contact with the gel and the surface in a perfect layer. Once the copy is firmly in place, wait a second and then peel up a corner of it. After just a few seconds, parts of the copy will begin sticking to the surface. If it doesn't stick and the gel is still wet, press the copy back down and wait. The time depends greatly on the image your using (whether it’s newspaper, magazine, photocopy, laser inkjet print, etc.) If the medium is not too thick, your transfer will be ready almost immediately. What you should see is your photocopy separating apart. The black toner and the layer of paper facing it should be stuck to your surface. The rest of the paper in your hand should have the toner removed from it. If you have perfect timing, you can potentially see your image, but normally the image is somewhat visible and covered with fibers of paper. Be sure to let you transfer dry for at least a few hours, but preferably overnight, BEFORE moving onto step #5.
5. Now comes the fun part - bringing the image back out. Take a small dish of water and get a half a drop on your finger and then moisten the layer of paper that is stuck on your transfer and rub it off. Repeat this process until all of the little fibers of paper are gone and you have a clean transfer. There are different methods for different circumstances, but just a tiny bit of water works well because you can get more friction and remove the paper more easily. This step can be kind of tricky, as you can rub away the transfer if it is not completely dry. But you can also get the paper off more easily if it is fresh and still a little moist. Your best bet would be to wait an hour, try it out, and then just give it some more time if it seems like you’re rubbing away the transfer.
6. Once your image is revealed and all the paper fibers are rubbed away, give your paper some time to dry before you start drawing and working back into the image.
Subscribe to:
Posts (Atom)