Wednesday, March 27, 2013

**CLASS WILL NOT MEET ON MONDAY APRIL 1ST**

I'll be installing my solo show at the Art Building West Gallery on Monday, April 1st and we will therefore not be meeting as class that day. Please use that time to work on you Perspective drawings, due on Wednesday, 4/3. Your assignments should reflect that you were allowed a full work to work on them.

Wednesday, 4/3 we will meet as a class at the usual time & place.

Don't forget you are all invited to come check out my thesis show, open from April 2-8, with the reception happening on Saturday, April 6th, from 6-8pm, there will be food & refreshments!


Assignment due Wednesday, 4/3: Draw an Interior Room in One-Point Perspective


Vincent Van Gogh
"Vincent's Bedroom in Arles", 1888


Using what you learned about perspective from this week's in class exercises, draw an interior room in one-point perspective using graphite and/or charcoal and your 19"x24" Bristol drawing paper (you will also need a ruler). Remember that YOU determine the vanishing point; think of your eyes as laser beams shooting into one point, then extending outwards horizontally to create the horizon line or "eye-level" line. Also remember that these are imaginary lines that we use to create the illusion of 3-dimensional space onto a 2-dimensional picture plane, so do your best to eliminate these process lines in your final drawing.


Some images to guide you:


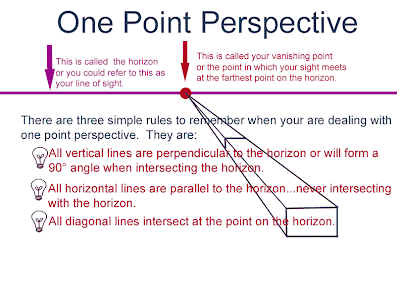
'H' indicates the horizon line here, with the large red dot marked 'V' being the vanishing point.


Again the vanishing point is marked in red, with all the angles of the room and its objects descending into that point.


Example of a final result where the process lines have been eliminated:


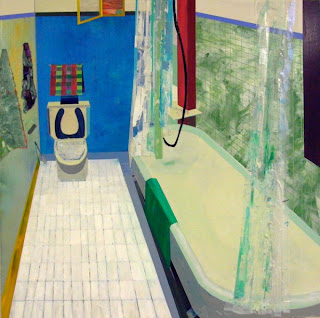
Artist Example for Perspective

Michael Perrone


More on Two-Point Perspective


When using two-point linear perspective, one must look carefully at the placement of the object. If the object is not perpendicular and parallel to you and you are looking at it's corner, then you probably want to work in two-point. Sometimes when working in two-point perspective one of the vanishing points is not on the page. You then must approximate where the point falls by looking at the angles of the object that you are drawing. The best way to approximate an angle and find a vanishing point in two-point perspective is to first find your horizon line. This is a level line. By using this level and placing it next to the front corner of the object one can then see the angle and continue this angle out until it intersects with the horizon line. After you have found this intersection, then you have established your vanishing point for all the planes that are parallel and recede the same direction. Repeat this process for the other side
of your object and all convergence lines will be established.

Hint: Find your horizon line first. Then find out how much distance in proportion to the object's height there is between the horizon line and the front vertical edge of the object. This will help eliminate distortions.

Basics of One-Point, Two-Point & Three-Point Perspective

One-Point Perspective (normal view) has one vanishing point. Think of pictures of lonely abandoned roads. The road eventually vanishes into nowhere, usually the center. That's your one point perspective. If you were creating an imagined space in One-Point Perspective, you could place a point somewhere on the page (vanishing point), and draw lines out from it (horizon line). Draw two vertical lines, and you've made a wall. A flat surface should follow those lines to provide scale.


Two point perspective has two vanishing points on the horizon, usually one left and one right. Think of looking at the corner of a building from a distance, you'd see one wall disappearing off to one side, and one to the other side. Again, scale is created by placing lines radiating out from both points.


Three-Point Perspective ("birds eye view") has three vanishing points. Keep in mind that when using three point perspective things get a little weird. When working with this concept, objects become very distorted since you do not have the real space to emulate the real world. Therefore, objects seem squished and distorted. This is often used in animation, especially with action comics to create drama, action and sense of space in an imagined world.


A couple youtube videos you might find helpful:

One-Point Perspective: www.youtube.com/watch?v=adRWYWSw2XI     
Two-Point Perspective: www.youtube.com/watch?v=KE3ZkWtX8UU   

Wednesday, March 20, 2013

Descending Horizon Line Drawing, In class on Mon. 3/25

Important vocabulary words to understand and remember:

Horizon line (eye-level line): The line where the sky and the earth seem to meet. Also—and most importantly—this is the eye level of the viewer or artist.
Vanishing Point: Point on the horizon at which receding parallel lines meet in a perspective drawing. In one-point perspective, this is also the point directly in front of the viewer.
Diagonal vanishing point: an auxiliary vanishing point used to draw receding parallel, diagonal lines and to divide planar surfaces equally. See accompanying illustrations.
Station point: Point of view from which a drawing and measurements for a drawing are made; the place where the artist is sitting or stationed.
Picture plane: Surface of a drawing; the plane onto which images are projected.
Sighting: Technique of using a pencil to “measure” proportions and estimate angles.

Descending Horizon Line drawing: On a piece of paper draw four different
formats and in the first one have the horizon line sit one fourth of the way
down in the format. Keep descending this horizon line down in each following
format until the last one is about 3/4 of the way down. Now draw the five
forms within each format, moving them closer together as the horizon line
descends. This assignment will help you to understand the perspective
dependent on the viewer's position within the 'landscape'.


Wednesday, March 6, 2013

Tips for creating Composition & weekend homework

In class on Wednesday 3/6:
Complete at least four (4) composition studies in your sketchbook. Each study should focus on a different composition tip from the examples below. While you are working on these, I'll be coming around and taking a look at your collage portion of the midterm assignment.


Tips for creating Composition:

Rule of Thirds
Imagine that your image is divided into nine equal segments by two vertical and two horizontal
lines. Try to position the most important elements in your scene along these lines, or at the points where they intersect. Doing so will add balance and interest to your drawing.

Balancing Elements
Placing your main subject off-centre, as with the rule of thirds, can create a more interesting
drawing, but it can leave a void in the scene, which can make it feel empty. You can balance
the 'weight' of your subject by including another object of lesser importance to fill the space.

Leading Lines
When we look at a drawing our eye is naturally drawn along lines. By thinking about how you
place lines in your composition, you can affect the way we view the image, pulling us into the picture, towards the subject, or on a journey 'through' the scene. There are many different types of line -straight, diagonal, curvy, zigzag, radial etc - and each can be used to enhance our drawing composition.

Symmetry & Patterns
We are surrounded by symmetry and patterns, both natural and man-made. They can make
for very eye-catching compositions, particularly in situations where they are not expected. Another great way to use them is to break the symmetry or pattern in some way, introducing tension and a focal point to the scene.

Viewpoint
Before drawing your subject, take time to think about where you will draw it. Our viewpoint has
a massive impact on the composition of our drawing, and as a result it can greatly affect the message that the shot conveys. Rather than just drawing from eye level, consider drawing from high above, down at ground level, from the side, from the back, from a long way away, from very close up, and so on.

Negative Space
Think about the balance between positive and negative space

Depth
Because drawing is a two-dimensional medium, we have to choose our composition carefully
to convey the sense of depth that was present in the actual scene. You can create depth in a drawing by including objects in the foreground, middle ground and background. Another useful composition technique is overlapping, where you deliberately partially obscure one object with another. The human eye naturally recognizes these layers and mentally separates them out, creating an image with more depth.

Framing
The world is full of objects that make perfect natural frames, such as trees, archways and
holes. By placing these around the edge of the composition you help to isolate the main subject from the outside world. The result is a more focused image, which draws your eye naturally to the main point of interest.

Cropping
Often a drawing will lack impact because the main subject is so small it becomes lost among
the clutter of its surroundings. By cropping tight around the subject you eliminate the
background ‘noise’; ensuring the subject gets the viewer's undivided attention.

Experimentation
Take advantage and experiment with your composition - you never know whether an idea will
work until you try it.

Composition in drawing is far from a science, and as a result all of the 'rules' above should be
taken with a pinch of salt. If they don't work in your piece, ignore them; if you find a great composition that contradicts them, then go ahead and use it anyway. But they can often prove to be spot on, and are worth at least considering whenever you are working.

Monday, March 4, 2013

Homework for Wednesday 3/6--Collage portion of Midterm Assignment is due!

Just a reminder that what I will be checking on Wednesday (3/6) is the COLLAGE portion of your Midterm drawing. So for Wednesday you must have decided on a found image to work from (i.e. from a magazine, newspaper, printout from the internet, etc.), and have completed the collage in your sketchbook inspired by or reacting to the found image. Remember that your materials for the collage can also all be "found" materials, i.e. ripped up magazine pages, ripped up newspaper, construction paper, etc...and remember that you are free to use color in these. I won't actually be collecting your collage till the midterm critique (Wed. 3/13) when you turn in the finished drawing, but I will be checking that you've completed your collage. You need to hold on to your collages till the critique as it is an important source for you to work from in executing the finished drawing.

Midterm Collage Drawing Assignment, due Wednesday, March 13th

For this assignment, choose an image out of a magazine or newspaper and then create a torn/cut paper collage based on that image. Next, on another sheet of paper you will use a low-end transfer technique to collage one or two pieces of your original image photographically onto the page. Finally, your task is to draw in the surrounding areas by using the collage you had created as a source. Before starting your transfer process and final drawing, I would recommend masking off a border with your drafting tape, approx. 1” in from the border of the page.

Through this multiple step process you will have transformed a found image into your own piece, partially combining the original source with a twice-abstracted version of that same source. The final products tend to evolve into an unexpected twist of the original image.


Materials:

Found magazine or newspaper image
Glue or tape
Matte gel medium (for transfer process)
Foam brush
22”x30” watercolor paper (for final drawing)
Any combination of ink wash, charcoal, graphite, conté crayon, etc.

Student examples of finished Midterm assignment (drawing portion):


Acrylic Gel Transfer Guidelines

Below are instructions for the process that I demonstrated in class today (Monday 3/4). This process will be used in the final drawing portion of your Midterm assignment, due next Wednesday 3/13.

Acrylic Gel Transfer guidelines:


First, I’d recommend making a few photocopies of your original image before attempting the transfer. Ideally, you’ll want to transfer the original image, but it will be good to have a couple photocopy backups in case things go wrong on your first try.

Keep in mind that your aim is merely to transfer some pieces of your image onto your final drawing. It by no means needs to be a beautiful, clean transfer. This process holds many possibilities, but it is also a very unpredictable one, so don’t get frustrated if things don’t go perfectly, just improvise and do your best.


How to do a transfer:

1. Take your surface and make sure it is relatively clean. (Remember this will work best on nice, heavy watercolor paper. Lesser quality paper will tend to pull up when you pull off the image; essentially it will do the opposite of what we are trying to achieve.) Next figure out what image you are using and where you want it to go. You can apply the gel medium either to the surface or directly onto the image.

2. Apply the gel medium onto the image (either with a foam brush or just with your fingers) until it completely coats the surface. Different amounts get different results. Sure, you can just glom it on there, but you will have to wait awhile until it is completely dry. This can, however, achieve a thick, glossy surface with the transfer sitting on top of it. If the surface is uneven and toothy, this can be helpful. If the surface is flat and smooth, then you really need just a thin layer of medium in order to make it work.

3. Once you have the proper amount of medium going, then its basically like gluing one thing to another - pretty simple. Lay down the image, and then press it down firmly into place. Then, either with your hand, the edge of a scissor handle, wooden spoon, etc. begin smoothing and pressing down the image from the middle out. Here's where excessive medium can harm the process. If there's too much, the image will slip around on the surface. You want the image to really be sticking in place. One method is to use a roller to flatten the image, just lay down a piece of paper on top otherwise the gel will ooze all over the place. At any rate, smooth down the image with your hand or other tool until the image is solidly stuck down. No air bubbles or blobs of medium should be underneath.

4. The idea here is that the image or photocopy is 100% in contact with the gel and the surface in a perfect layer. Once the copy is firmly in place, wait a second and then peel up a corner of it. After just a few seconds, parts of the copy will begin sticking to the surface. If it doesn't stick and the gel is still wet, press the copy back down and wait. The time depends greatly on the image your using (whether it’s newspaper, magazine, photocopy, laser inkjet print, etc.) If the medium is not too thick, your transfer will be ready almost immediately. What you should see is your photocopy separating apart. The black toner and the layer of paper facing it should be stuck to your surface. The rest of the paper in your hand should have the toner removed from it. If you have perfect timing, you can potentially see your image, but normally the image is somewhat visible and covered with fibers of paper. Be sure to let you transfer dry for at least a few hours, but preferably overnight, BEFORE moving onto step #5.

5. Now comes the fun part - bringing the image back out. Take a small dish of water and get a half a drop on your finger and then moisten the layer of paper that is stuck on your transfer and rub it off. Repeat this process until all of the little fibers of paper are gone and you have a clean transfer. There are different methods for different circumstances, but just a tiny bit of water works well because you can get more friction and remove the paper more easily. This step can be kind of tricky, as you can rub away the transfer if it is not completely dry. But you can also get the paper off more easily if it is fresh and still a little moist. Your best bet would be to wait an hour, try it out, and then just give it some more time if it seems like you’re rubbing away the transfer.

6. Once your image is revealed and all the paper fibers are rubbed away, give your paper some time to dry before you start drawing and working back into the image.